
How to Build a Custom Blade Directive with Automated Input Validator-Attribute Matching
Laravel is a powerful framework that offers a whole suite of built-in goodies meant to help enormously speed up application development. Blade, its built-in templating engine, and Eloquent, the ORM it ships with, are two of the most especially useful utilities Laravel brings to the table. As you build apps in Laravel, you will inevitably be faced with the need to declare input rules on your HTML inputs to ensure the user enters data in the correct format for your models to handle.
An Example
This is not a difficult thing to do. Let’s say, for instance, you have a model, called Product. The table that product represents has seven fields: name, description, price, created_at, updated_at, and deleted_at. The former two are strings with a maximum length of 255 characters (Laravel’s string default), price is an unsigned integer representing the product’s price in cents, and the final three are Laravel’s default timestamps and soft deletes fields (which are all timestamps). None are nullable except deleted_at, obviously. Your Laravel model for this class will be very simple:
class Product extends Model
{
    use HasFactory;
    use SoftDeletes;
}
Simple indeed! Laravel does all the hard work of setting up the requirements for attributes automatically. But, a model doesn’t do us much good in our application without a way to create instances of it and save them to our database. To do that, we need to create a form:
<form action="POST" action="/create-product">
    @csrf

    <label for="name_input">Name:</label>
    <input
        type="text" name="name"
        id="name_input"
        required minlength="1" maxlength="255"
    >

    <label for="description_input">Description:</label>
    <input
        type="text" name="description"
        id="description_input"
        required minlength="1" maxlength="255"
    >

    <label for="price_input">Price:</label>
    <input
        type="number" name="price"
        id="price_input"
        required min="0" max="9999999" step="1"
    >

    <input type="submit">
</form>
This form contains inputs for each of the three user-defined fields on the model name, description, and price. As you can see, there is a lot of work to get all the inputs set up with their proper types, labels, and validators. And, there are a lot of “magic values” scattered throughout.
We begin by creating an input for each field, set the field name, and then set the type of the field (text for name and description, and number for price). Then, we add a label before each input field, ensuring that the for attribute on the label corresponds to the id attribute on the input.
We have to add a required validator to each input since each of the database fields was not nullable. Then, we set the minlength and maxlength fields on the two text inputs to limit their sizes to correspond with the default Laravel string field size (255 characters). Meanwhile, we set min to 0 on the price input (because it is unsigned), we set max to a very large number that is still small enough to fit into the database column, and step to 1 because the database field is an integer field.
As you can see, this is an incredibly repetitive system that involves a lot of repeat code and clicking back and forth between different files and possibly a database terminal to make sure you get all the values right. Surely we can automate this, right?
Coupling Table Schema and Inputs
The answer to that is a resounding YES! Because we can access the table schema through the Laravel model, we can write a custom Blade directive to automatically figure out which input types and rules to apply to the input for a given model attribute. This directive should take in a couple of attributes: a model name, and an attribute name. It can then use those two pieces of information to output an appropriate html input element. Let’s take a look at how it should look:
@modelInput(Product, price, ['this is the' => 'arguments array!'])Something like this is how the blade directive should be called. When it is rendered by blade, that directive should output something like:
<label for="price_input">Price:</label>
<input
    type="number" name="price"
    id="price_input"
    required min="0" max="9999999" step="1"
>
The real kicker, though, is that it will correctly output an input for any attribute of any Eloquent model. This is the ultimate way to reduce code duplication resulting from html input rules and labels. Let’s take a look at how to implement it!
Building a Directive
There will be several steps in building this directive. The steps are:
- Create and Register the Service Provider
- Load in the arguments.
- Get the schema for the attribute.
- Determine input type.
- Add input rules.
- Echo the input.
Let’s get started!
Creating a Service Provider
We will begin by creating a new service provider to house the code for our new Blade directive. Begin by running the following Artisan command:
php artisan make:provider ModelInputBladeServiceProviderThis will create a new file at app/Providers/ModelInputBladeServiceProvider.php. Now, we need to register it with the app. To do this, open the config file for the app at config/app.php. Scroll down to the ‘providers’ key, and add the new class to the array. It should look like:
'providers' => ServiceProvider::defaultProviders()->merge([
    /* other service providers */
    App\Providers\ModelInputBladeDirectiveServiceProvider::class
])->toArray(),
Then, return to the ModelInputBladeServiceProvider.php file. Add a new blade directive to the boot() method of the class using the Blade facade.
public function boot(): void
{
    Blade::directive('modelInput', function ($expression) {
        // IMPLEMENTATION HERE
    }
}
The first string is the key of the directive. It determines what you will type in your views in order to call the new directive. So, in this case, the directive will be called by typing “@modelInput” Most of the rest of our code will be implemented within this block.
Loading in the Arguments
The first step is to load in the arguments for model name and attribute name. Recall that the call to the blade directive should look like this:
@modelInput(Product, price)The first argument is the name of the model which we want to create an input for, and the second is the name of the attribute the input should represent. Now, back to our directive.
Blade::directive('modelInput', function ($expression) {
    //parse the arguments
    list($model, $field, $args) = explode(',', $expression, 3);
    $model = trim($model);
    $field = trim($field);
    $args = eval("return $args;");
}
Anything included in the parentheses of the directive will be passed into the function of the Blade::directive call as a string, represented here as $expression. So, in this case:
$expression = "Product, price, ['this is the' => 'arguments array!']";This is a limitation of Blade directives: only a single string can be passed into the directive. So, to parse out the two arguments, we need to explode $expression on comma, and then remove all extra whitespace.
list($model, $field) = explode(',', $expression, 3);
$model = trim($model);    // "Product"
$field = trim($field);    // "price"
$args = eval("return $args;"); //arguments
This splits the string in $expression on the comma, with the third argument ensuring three arguments are passed in. Then, we remove whitespace from each independent string to ensure we have just the model and attribute names, and evaluate the third argument to get a php array. We will use these strings to get an instance of the model, and we will use that model instance to get the table name:
//get model and table name
$model_class = app()->getNamespace() . "Models\\" . $model;
$instance = resolve($model_class);
$table_name = $instance->getTable();
Look at that! Now, we have the table name. We can use that to get more information about the column of that table that our model attribute corresponds to.
Getting Table Metadata
Let’s get all the metadata on the column we passed in to our directive in an organized array.
//get data schema for table
$schema = [];
$db = DB::connection()->getDoctrineSchemaManager();

//get the column of the attribute
$doctrine_column = $db->listTableDetails($table_name)->getColumn($field);

//build the schema array for the column
$schema = array(
    'type' => $doctrine_column->getType()->getName(),
    'length' => $doctrine_column->getLength(),
    'precision' => $doctrine_column->getPrecision(),
    'scale' => $doctrine_column->getScale(),
    'unsigned' => $doctrine_column->getUnsigned(),
    'fixed' => $doctrine_column->getFixed(),
    'notnull' => $doctrine_column->getNotnull(),
    'autoincrement' => $doctrine_column->getAutoincrement(),
    'default' => $doctrine_column->getDefault(),
    'comment' => $doctrine_column->getComment(),
);
That should do the trick. Now, we have an array, called $schema, that contains all the essential attributes about our column. Now, we can use this schema to set attributes, like, type, minlength, maxlength, and more, on our html input.
Setting Input Type
We should determine what type attribute our input should have first, because that will determine which validators we need to include. I did this by creating an associative array mapping the possible values of schema[‘type’] to input type names. Here is what that looks like:
const FIELD_TO_INPUT_TYPE_MAP = [
    'string' => 'text',
    'text' => 'textarea',
    'integer' => 'number',
    'smallint' => 'number',
    'bigint' => 'number',
    'decimal' => 'number',
    'float' => 'number',
    'boolean' => 'checkbox',
    'date' => 'date',
    'datetime' => 'datetime-local',
    'time' => 'time',
];
This creates a link between the type of our database column, and the type attribute that will appear on our html input. Then, all we have to do is perform different logic based on the type of the column in question:
Adding Input Rules
//array holding all the input validator rules we will output
$rules = [];

//check if input should be required
if ($schema['notnull']) {
    $rules['required'] = true;
}

//rules for text input types
switch (FIELD_TO_INPUT_TYPE_MAP[$schema['type']]){
    case 'textarea':
    case 'text':
        //set initial min and max lengths
        $rules['minlength'] = 0;
        $rules['maxlength'] = $schema['length'];

        //check if required
        if ($schema['notnull']) {
            $rules['minlength'] = 1;
        }

        //check if fixed length
        if ($schema['fixed']) {
            $rules['minlength'] = $schema['length'];
            $rules['maxlength'] = $schema['length'];
        }

        break;
    case 'number':
        //calculate max and min value the field could hold
        $max = null;
        $min = null;
        $total_digits = $schema['precision'];
        $decimal_digits = $schema['scale'];
        $whole_digits = $total_digits - $decimal_digits;
        if ($schema['unsigned']) {
            $max = pow(10, $total_digits) - 1;
            $min = 0;
        } else {
            $max = pow(10, $whole_digits) - 1;
            $min = -1 * pow(10, $whole_digits);
        }

        //set min and max values
        $rules['min'] = $min;
        $rules['max'] = $max;

        //calculate step value
        $step = pow(10, $decimal_digits * -1);
        $rules['step'] = $step;
    case 'checkbox':
        //no additional rules needed
        break;
    case 'date':
        //set the default to the current day
        $rules['value'] = date('Y-m-d');
        break;
    case 'datetime-local':
        //set the default to the current date and time
        $rules['value'] = date('Y-m-d\TH:i');
        break;
    case 'time':
        //set the default to the current time
        $rules['value'] = date('H:i');
        break;
    case 'file':
        //no additional rules needed... yet!
        break;
}
In the block of code above, all that happens is html input validator rule keys are associated with their values based on the type of input we have, and the other values in the $schema array. So, for a number input, the min, max, and step, validators are set, while for a text input, minlength and maxlength are set.
Now, we have an array containing all the rules we need to build our input. We just need to compile them all into an html element.
Building the Input
Let’s begin by compiling all our rules into a string:
//string representation of the attributes
$attributes_string = '';

//add rules to string
foreach ($rules as $key => $value) {

    //skip empty values
    if (!isset($value) || $value === false) continue;

    //add the attribute to the string
    $attributes_string .= $key . '="' . $value . '" ';
}
Quite simple! Just append the attribute key, followed by an equals character, to the value set in the switch statement, enclosed in quotes. This string is ready to be used inside an html input now!
To end our directive, we just need to return a php snippet that echoes our input to the screen. Then, our blade directive will be able to create html inputs in the DOM. Let’s build the input now:
$echo_str = sprintf(
    '
    <?php
        //execute the programmer-specified code first...
        $value = %s;

        //then, below, escape the value that code returned and echo it
    ?>
    <div class="%s">
        <label for="%s" class="%s">%s</label>
        <input
            type="%s"
            name="%s"
            id="%s"
            class="%s"
            value="<?php echo htmlspecialchars($value, ENT_QUOTES, \'UTF-8\') ?? \'\' ?>"
            %s
        >
    </div>',
    isset($args['attributes']['value']) ? $args['attributes']['value'] : 'null',
    htmlspecialchars(isset($args['container_classes']) ? $args['container_classes'] : '', ENT_QUOTES, 'UTF-8'),
    htmlspecialchars(isset($args['attributes']['id']) ? $args['attributes']['id'] : $id, ENT_QUOTES, 'UTF-8'),
    htmlspecialchars(isset($args['label_classes']) ? $args['label_classes'] : '', ENT_QUOTES, 'UTF-8'),
    htmlspecialchars(isset($args['label_text']) ? $args['label_text'] : $field, ENT_QUOTES, 'UTF-8'),
    htmlspecialchars(isset($args['attributes']['type']) ? $args['attributes']['type'] : self::FIELD_TO_INPUT_TYPE_MAP[$schema['type']], ENT_QUOTES, 'UTF-8'),
    htmlspecialchars(isset($args['attributes']['name']) ? $args['attributes']['name'] : $field, ENT_QUOTES, 'UTF-8'),
    htmlspecialchars(isset($args['attributes']['id']) ? $args['attributes']['id'] : $id, ENT_QUOTES, 'UTF-8'),
    htmlspecialchars(isset($args['input_classes']) ? $args['input_classes'] : '', ENT_QUOTES, 'UTF-8'),
    $attributes_string
);
Recall that when we loaded in the arguments to our blade directive, we were passed an array, which we stored in $args. We use this array to allow the programmer to customize the generated inputs with common fields like id, name, or class. Then, we can make our blade directive output this element by simply returning a string of php that echoes this string:
return "<?php echo '" . $echo_str . "'; ?>";That’s all there is to it. Now, your directive will output the input with a preconfigured label, automatic type selection, and validator generation all on its own. You would use it like this:
@modelInput(Product, price, [
    'id' => 'price_input',
    'label_classes' => 'text-sm',
    'label_text' => 'Price',
    'input_classes' => 'p-1'
])
My Library
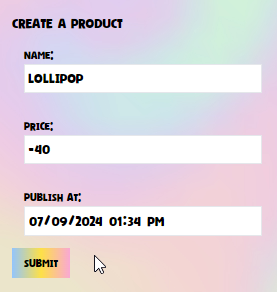
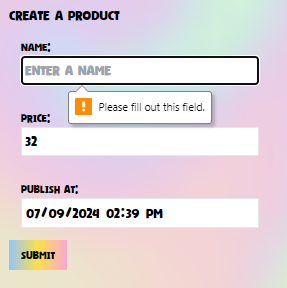
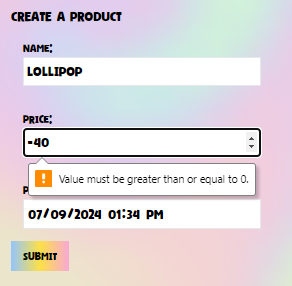
Now that you understand how all this works, it seems like a good time to mention that I have actually written a fully featured library implementing everything I have described here, and more: Laravel ModelInput. This guide is actually a walkthrough of the design for a simplified version of what I have built in Laravel ModelInput. To learn more, install, view the source, or recommend a feature, check out the repository or contact me.
My library in action:
Final Considerations
If you recall, we used eval to pass a php array into our directive. Because of this, to set the value of the input using a php expression, you need to pass you line of php code in as a string in the args array. Otherwise, it will be evaluated when it is passed in to the directive, instead of when the directive is called by a user. Laravel’s view caching combines with this to produce unexpected results where inputs will be populated with values from other user’s accounts, which is a BIG no-no!
Related to this, you need to be careful what data you pass to this directive, as it runs the input string as php code. Be careful not to pass in any data that users of your application can set the value of!
Conclusion
Today, we have learned how to create a new service providers and blade directives in Laravel, how to access the schema underlying an Eloquent model, and how to bridge the gap from database schema to input attributes. And, you have been introduced to my tool of choice, which I developed myself, and is available for you to use free of charge, in automating the creation of html inputs. I hope this guide has proven useful. Best of luck in your Laravel development, and happy coding!
Leave a Reply